


Install Window Treatments in 1 Hour: Pro DIY Guide
You’ve measured your windows three times, read the instructions twice, and still can’t figure out why your curtains hang crooked or your blinds won’t stay level. Improper measurement causing poor fit is a common installation mistake that frustrates countless homeowners. This guide delivers clear, tested methods to measure, mount, and adjust window treatments with professional precision in about one hour per window. You’ll learn to avoid the pitfalls that waste time and materials while achieving the polished look you want.
Table of Contents
- What You Need Before You Start: Tools, Materials, And Preparation
- How To Measure Your Windows Accurately
- Installing Hardware: Mounting Brackets And Anchors
- Attaching And Adjusting Window Treatments
- Installing Treatments On Special Window Types
- Common Mistakes To Avoid And Troubleshooting Tips
- Alternative Installation Approaches And When To Use Them
- What To Expect: Timelines, Costs, And Success Indicators
- Explore Custom Window Treatment Fabrics And Styles
- Frequently Asked Questions About Installing Window Treatments
Key Takeaways
| Point | Details |
|---|---|
| Accurate measuring ensures proper fit | Measure width and height within 1/8 inch for inside or outside mounts to prevent gaps and poor function. |
| Proper tools prevent installation failures | Use level, drill, tape measure, wall anchors, and screws to secure brackets firmly on any wall type. |
| Installation takes about 1 hour per window | DIY installation is feasible with proper preparation and step by step guidance for most standard windows. |
| Common mistakes cause instability | Uneven brackets, missing drywall anchors, and rushed measuring create crooked, unsafe treatments that need redoing. |
| Special windows need adapted methods | Bay, arched, and sliding door windows require specific hardware and techniques covered in this guide. |
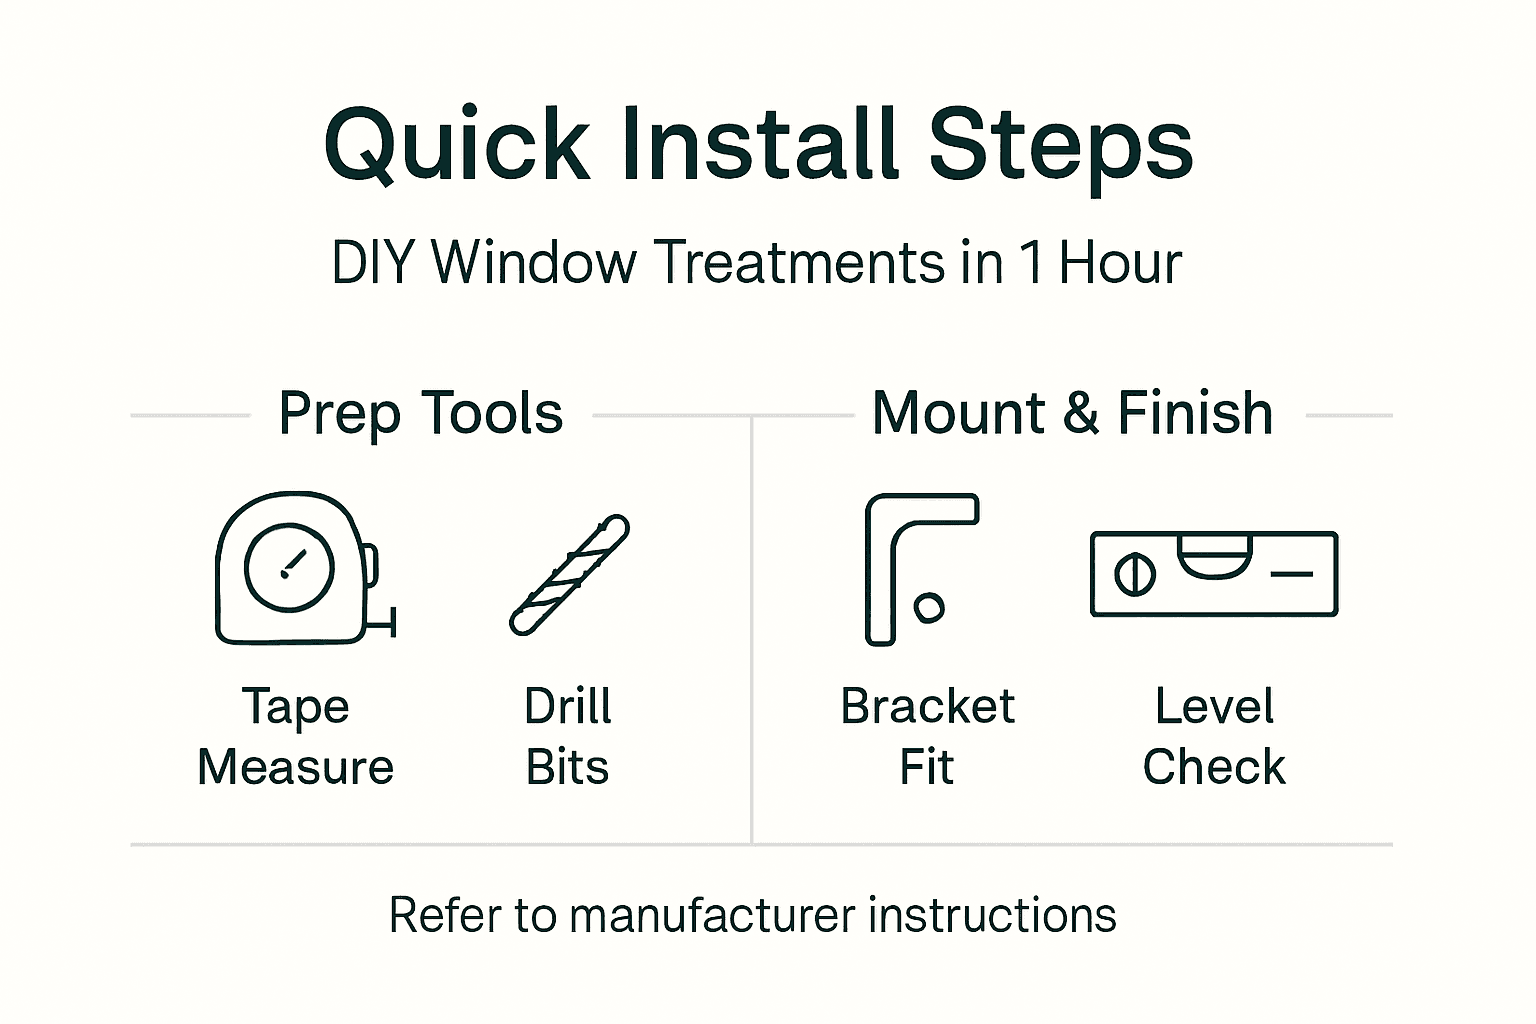
What You Need Before You Start: Tools, Materials, and Preparation
Starting unprepared guarantees frustration and wasted effort. Essential tools for installing window treatments include drill, screws, screwdriver, measuring tape, pencil, level, and appropriate wall anchors based on wall material such as drywall or brick. Your basic toolkit should contain:
- Cordless drill with bits matching your screw size
- Tape measure capable of extending across your widest window
- Carpenter’s level at least 24 inches long
- Phillips and flathead screwdrivers
- Pencil for marking bracket positions
- Wall anchors rated for your treatment’s weight
- Screws provided with your hardware or appropriate substitutes
Wall type matters significantly. Drywall requires plastic anchors or toggle bolts to distribute weight and prevent tearing. Brick or concrete needs masonry bits and specialized anchors. Understanding essential fabric tips for window treatments helps you select materials that complement your installation efforts.
Clear the installation area completely. Move furniture away from windows, remove existing treatments, and lay drop cloths to catch debris. This preparation prevents accidents and lets you move freely during installation. Verify your drill battery is charged and test your level’s accuracy by flipping it on a flat surface.
Pro tip: Organize all tools on a small table within arm’s reach of your work area. Place screws in a magnetic tray or shallow dish to prevent losing them. Check that your installation tools and practices match professional standards before drilling your first hole. The five minutes spent organizing saves twenty minutes of searching later. Consider how window treatments’ impact on comfort extends beyond aesthetics to include energy efficiency and privacy.
How to Measure Your Windows Accurately
Measurement errors multiply through every installation step. You need precision within 1/8 inch for treatments that fit correctly and operate smoothly. Start by deciding between inside mount (fitting within the window frame) and outside mount (extending beyond the frame for better light control and coverage).
For inside mount measurements:
- Measure window width at the top, middle, and bottom of the frame
- Record the narrowest width measurement to ensure clearance
- Measure height from top of frame to sill at left, center, and right
- Use the longest height measurement for proper coverage
- Check frame depth to confirm brackets will fit without hitting glass
Outside mount requires different calculations. Measure the width you want to cover, typically extending 3 to 4 inches beyond the frame on each side. Measure height from your desired top position to where you want the treatment to end, usually 4 inches above the frame and extending to the sill or below.
Account for obstacles like window cranks, locks, or protruding trim. Note these positions on your measurements. Irregular windows need measurements at multiple points to identify the true dimensions. Double check every measurement before marking bracket positions. Following curtain installation measuring tips prevents costly ordering mistakes.
Write measurements clearly with labels indicating which window and which dimension. Take photos of windows with a tape measure visible for reference when ordering. This documentation becomes invaluable when questions arise during installation or if you need to order replacement parts later.
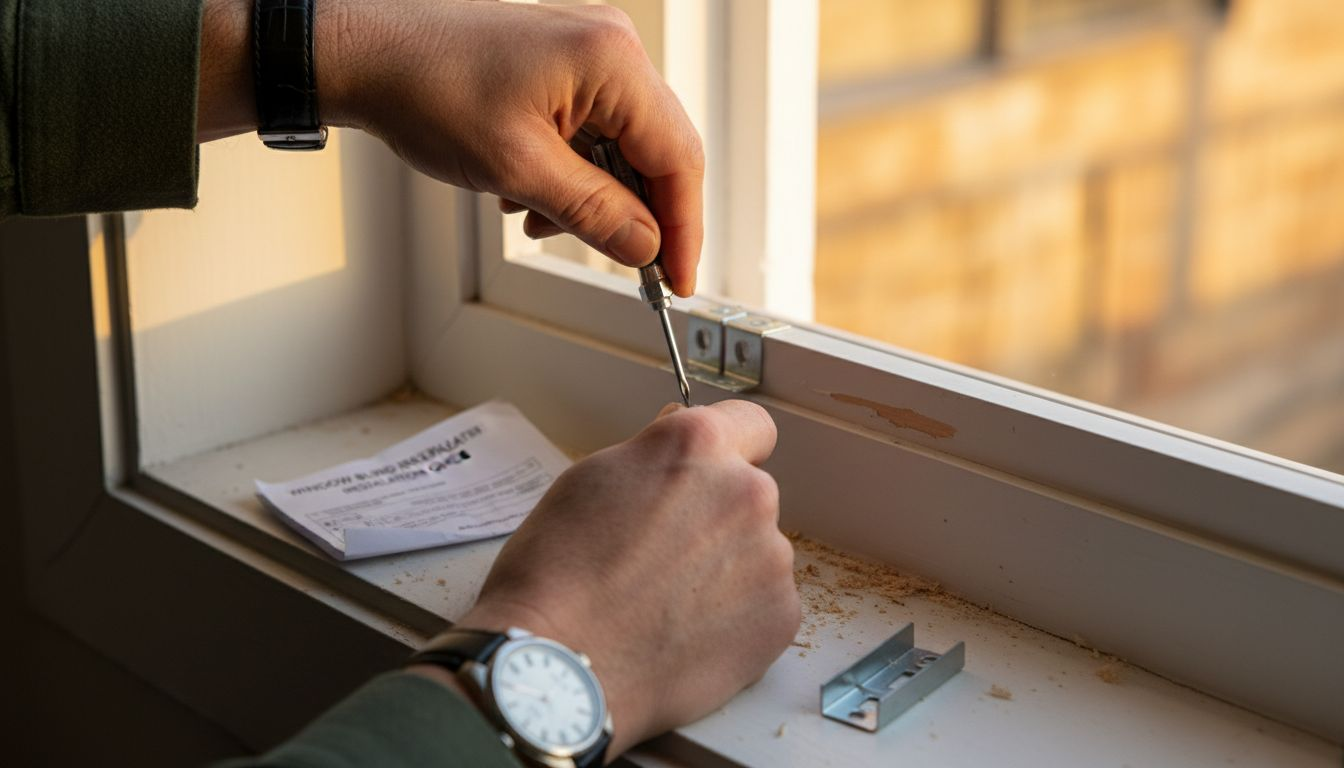
Installing Hardware: Mounting Brackets and Anchors
Secure brackets form the foundation of stable window treatments. Rushing this step creates problems that worsen over time as gravity and daily use stress weak mounting points. Avoid common mistakes such as uneven bracket placement and failure to use anchors in drywall causing instability.
Follow these steps for professional bracket installation:
- Mark bracket positions using your measurements and a pencil, ensuring they align with your treatment’s mounting holes
- Place your level across the marks to verify they’re perfectly horizontal, adjusting as needed
- Check that brackets are evenly spaced according to manufacturer specifications, typically matching the treatment width
- Pre-drill pilot holes slightly smaller than your screw diameter to prevent wall cracking and make driving easier
- Insert wall anchors firmly into pilot holes if mounting on drywall, tapping gently until flush with the surface
- Align brackets over pilot holes and drive screws gradually, alternating between screws to maintain level positioning
- Tighten screws firmly but avoid over-tightening, which can strip anchors or crack drywall
Wall anchor selection depends on your treatment’s weight. Lightweight cellular shades need basic plastic anchors rated for 10 to 15 pounds. Heavy wooden blinds or lined drapery require toggle bolts or metal anchors supporting 30 pounds or more per bracket. When mounting into studs, skip anchors and drive screws directly into the wood for maximum strength.
Inside mount brackets attach to the top of the window frame or the sides, depending on your treatment type. Outside mount brackets fasten to the wall above and outside the frame. Reference your hardware mounting guide for treatment specific instructions that match your window configuration.
Pro tip: After installing brackets, test their stability by pulling firmly downward and outward. They shouldn’t move or flex. If you feel any give, add another anchor or relocate to a stud. Understanding common installation mistakes and fixes helps you recognize problems before they become failures.
Attaching and Adjusting Window Treatments
With secure brackets in place, attaching your treatments becomes straightforward. Most systems use clips, slides, or simple drop-in mechanisms designed for easy installation and removal. Handle your treatments carefully to avoid bending or damaging delicate components.
Position yourself comfortably with the treatment at chest height. For roller shades and blinds, locate the bracket engagement points on the headrail. Slide or clip one end into its bracket first, then compress the spring-loaded opposite end to fit into the remaining bracket. You should hear or feel a click when properly seated.
For curtain rods:
- Thread curtain rings or panels onto the rod before mounting if using a one-piece system
- Insert one rod end into its bracket, then lift the opposite end into place
- Secure any retention clips or screws that lock the rod in position
- Adjust curtain pleats and spacing evenly across the rod length
- Verify the rod sits level and doesn’t sag in the middle
Test operation immediately. Raise and lower shades or blinds through their full range, checking for smooth movement without binding or tilting. Open and close curtains to ensure rings glide freely. Make small adjustments to brackets if you notice uneven hanging or operational issues.
Curtain length requires careful attention. Panels should kiss the floor for a clean look, hovering about 1/4 inch above for easy movement. Too short looks unfinished while too long creates tripping hazards and fabric wear. Adjust curtain clips or hem lengths as needed. Check attaching and adjusting curtains for detailed guidance on achieving professional draping.
Perform a final security check by gently tugging on the treatment. Nothing should shift, wobble, or feel loose. Stand back and view from multiple angles to verify visual balance and proper alignment with the window frame.
Installing Treatments on Special Window Types
Bay windows, arches, and sliding doors demand adapted installation approaches. Standard straight rods and brackets won’t accommodate curves or unusual dimensions. Specialized hardware makes these installations manageable.
Bay windows need flexible track systems or angled connectors. Flexible curtain tracks bend to follow the window’s curve, mounting to the ceiling or wall above each section. Measure each bay section individually, then add the measurements for total track length. Connect track sections at angles matching your bay’s configuration. An alternative uses three separate straight rods with corner connectors, creating a segmented but functional solution.
Arched windows present unique challenges:
- Mount treatments on the flat wall above the arch for simple coverage
- Use specialty curved rods that follow the arch shape for a custom look
- Install brackets at multiple points along the curve for adequate support
- Consider stationary panels on curved rods, as operating mechanisms add complexity
Sliding glass doors work well with vertical blinds or panel track systems. These mount to the header above the door, hanging panels that stack to one side when open. Ensure adequate stacking space so panels don’t block the door opening. Standard curtain rods also work if mounted high and wide enough to clear the door when open.
| Window Type | Mounting Method | Special Hardware Needed | Installation Difficulty |
|---|---|---|---|
| Standard rectangular | Wall or frame brackets | Basic brackets and rod | Easy |
| Bay window | Flexible track or angled connectors | Bendable track or corner pieces | Moderate |
| Arched window | Curved rod or above-arch mounting | Specialty curved rod and multiple brackets | Difficult |
| Sliding glass door | Header mount track system | Panel track or vertical blind track | Moderate |
Adjust treatment lengths for proportion. Tall sliding door treatments look best extending floor to ceiling. Small arched windows might need shortened panels to avoid overwhelming the space. Review special window type installation tips for current design approaches that balance function with aesthetics.
Common Mistakes to Avoid and Troubleshooting Tips
Recognizing potential problems before they occur saves significant time and frustration. Common installation errors include uneven brackets, missing drywall anchors, inaccurate measurements, and improper rod placement causing crooked or unstable treatments. Each mistake has identifiable causes and straightforward fixes.
Uneven brackets create the most visible problem. Treatments hang crooked, drawing the eye and appearing unprofessional. This happens when you skip the level or trust your eye instead of your tools. Always use a quality level for every bracket position. If you’ve already installed crooked brackets, remove them, fill the holes with spackling compound, and start fresh with proper leveling.
Skipping wall anchors on drywall guarantees failure. Screws alone pull out under the treatment’s weight, leaving holes and potentially causing the treatment to fall. Even lightweight shades need anchors unless you’re fortunate enough to hit a stud. If brackets feel loose after installation, remove the screws, install proper anchors, and remount.
Inaccurate measurements lead to gaps, binding, or treatments that don’t fit the ordered hardware. This wastes money on returns or modifications. The fix is prevention: measure twice, record clearly, and verify measurements before ordering. Keep your measuring tape straight and level during measurement to avoid distortion.
Poor rod positioning affects both appearance and function:
- Mounting too low limits light control and makes treatments look cramped
- Mounting too high creates odd proportions and complicates access
- Insufficient extension beyond the frame allows light gaps and reduces coverage
- Inadequate clearance above the window prevents proper stacking when open
Pro tip: Use painter’s masking tape to mark bracket positions before drilling. Press the tape firmly, mark your drill points on the tape, and verify everything is level and properly spaced. The tape prevents pencil marks on your wall and gives you a final chance to adjust before committing. This simple step catches errors that would otherwise require patching and repainting.
Gradually tighten screws to avoid stripping. Drive each screw most of the way, then alternate between screws for final tightening. This maintains even pressure and prevents brackets from tilting. If you strip a screw hole, move the bracket slightly and drill a new pilot hole. Learn to avoid installation errors by understanding why quality materials and proper technique matter. Additional guidance on common mistakes and fixes helps you troubleshoot unexpected issues.
Alternative Installation Approaches and When to Use Them
Permanent drilling isn’t always practical or permitted. Renters face restrictions on wall modifications. Quick seasonal changes need easily removable solutions. No-drill options provide flexibility with some tradeoffs in stability and weight capacity.
Tension rods use spring-loaded mechanisms that press against the inside of a window frame. They install in seconds without tools, making them ideal for lightweight curtains and temporary situations. The spring tension limits weight capacity to about 5 pounds, ruling out heavy fabrics or lined drapery. They work best for cafe curtains, sheers, or seasonal decorative panels.
Adhesive mounting brackets stick to walls or window frames using strong double-sided tape or command strips. Quality adhesive mounts support moderate weight when installed on smooth, clean surfaces. They fail on textured walls or in humid environments like bathrooms. Remove them carefully following manufacturer instructions to avoid paint damage.
| Installation Method | Ease of Installation | Durability | Wall Damage Risk | Best Use Cases |
|---|---|---|---|---|
| Drilled brackets with anchors | Moderate (requires tools) | Excellent long-term | Low when done correctly | Permanent installations, heavy treatments |
| Tension rods | Very easy (no tools) | Fair (can slip over time) | None | Rentals, lightweight curtains, temporary setups |
| Adhesive mounts | Easy (minimal tools) | Good in ideal conditions | Low to moderate on removal | Smooth surfaces, moderate weight, semi-permanent |
No-drill methods suit specific scenarios:
- Rental properties with strict no-alteration clauses in the lease
- Dorm rooms or temporary housing where you’ll move soon
- Testing window treatment styles before committing to permanent installation
- Locations where drilling risks hitting pipes or wiring
Permanent screwed mounts remain superior for long-term installations. They support heavier treatments, maintain level positioning over years of use, and provide the stability needed for motorized or frequently adjusted systems. When you own your home and plan to stay, invest the extra effort in proper drilling and anchoring. The result looks better and lasts indefinitely.
What to Expect: Timelines, Costs, and Success Indicators
Realistic expectations prevent disappointment and help you plan effectively. Installing window shades typically takes about 1 hour per window, making it a feasible DIY project for homeowners. Your first window might take longer as you learn the process, but subsequent installations go faster.
| Metric | Average Range | Notes |
|---|---|---|
| Installation time per window | 45 to 90 minutes | Decreases with experience; special windows take longer |
| Cost per window (materials) | $75 to $200 | Varies by treatment type, size, and fabric quality |
| Tools investment (one time) | $50 to $150 | Reusable for multiple windows and future projects |
Homeowners can expect to spend between $75 and $200 per window for quality cellular shades, with installation usually completed in about one hour per window. Custom drapery with designer fabrics costs more but delivers superior aesthetics and longevity. Budget treatments sacrifice quality but serve temporary needs or tight budgets.
Successful installation shows clear indicators. Treatments hang perfectly level when you step back and view from across the room. They operate smoothly through their full range without binding, tilting, or making unusual noises. Measurements match your specifications with proper fit and coverage. The installation looks clean with no visible errors or damage to walls.
Benefits extend beyond appearance. Properly installed treatments improve light control, letting you manage natural light throughout the day. Energy efficiency increases as treatments reduce heat gain in summer and heat loss in winter. Privacy improves, particularly important for ground floor windows facing streets or neighbors. Your home’s value benefits from updated, well-maintained window treatments that appeal to future buyers.
Plan for success by allowing adequate time without rushing. Start with one window to build confidence and refine your technique. Gather all tools and materials before beginning. Follow each step methodically rather than skipping ahead. The reward is professional results at DIY cost, plus the satisfaction of completing a visible home improvement project yourself. Check installation timelines and costs to calibrate your expectations against industry standards.
Explore Custom Window Treatment Fabrics and Styles
Now that you understand installation mechanics, the right fabric and style choices elevate your results from functional to exceptional. Premium designer fabrics transform standard window treatments into custom focal points that define your room’s character. Beautiful Window Elgin offers extensive selections of cotton, embroidered, and jacquard satin fabrics specifically curated for window treatments.

Your installation skills deserve fabrics that showcase them. Quality materials drape better, last longer, and maintain their appearance through years of sun exposure and use. Explore window treatment fabric tips to understand how fabric weight, weave, and finish affect both appearance and function. The impact of window treatments on home comfort extends to temperature control and acoustic properties influenced by fabric selection. Visit our detailed curtain installation guide for additional tips on pairing fabrics with installation techniques for stunning results.
Frequently Asked Questions About Installing Window Treatments
What is the difference between inside and outside mount window treatments?
Inside mount treatments fit within the window frame, creating a clean, built-in appearance that works well with attractive trim you want to display. Outside mount treatments attach to the wall above and beyond the frame, providing better light control by covering gaps and making windows appear larger. Choose inside mount when you have adequate frame depth and want a streamlined look, or outside mount when you need maximum coverage and light blocking.
How do I choose the right wall anchors for my drywall?
Match anchor type to your treatment’s weight and your wall thickness. Plastic expansion anchors work for lightweight treatments under 10 pounds, while toggle bolts or metal anchors support heavier treatments up to 50 pounds per anchor. Check the anchor package for weight ratings and ensure they’re long enough for your drywall thickness, typically 1/2 inch in most homes. When possible, locate and screw directly into wall studs for maximum strength.
Can I install window treatments on sliding glass doors myself?
Yes, sliding glass doors are manageable DIY installations using panel track systems or vertical blinds mounted to the door header. Measure the full width and height, ensuring adequate stacking space on one or both sides so panels don’t block the door opening. Use a sturdy ladder for safe access to the mounting area and follow manufacturer instructions for the specific track system. The process mirrors standard window installation but on a larger scale.
What tools do I absolutely need to install curtains correctly?
Essential tools include a tape measure for accurate dimensions, a level to ensure straight bracket placement, a drill with appropriate bits for your wall type, a screwdriver matching your screw heads, and wall anchors if mounting on drywall. A pencil for marking positions and a stepladder for safe access complete the basic toolkit. These tools handle most standard curtain installations and cost between $50 and $100 if purchasing new.
How do I fix crooked window treatments after installation?
First, identify whether the problem is unlevel brackets or a warped treatment. Use your level against the headrail to check. If brackets are uneven, loosen the screws on the lower bracket slightly and adjust its position upward until level, then retighten. For significantly off installations, remove the brackets, fill holes with spackling compound, let dry completely, and reinstall using proper leveling technique from the start. Prevention through careful initial leveling beats correction every time.
Recommended
- 7 Essential Window Treatment Fabric Tips for Homeowners – Shop Designer Fabrics by the Yard | Curtains & Drapery
- Why Custom Window Treatments Matter for Homes – Shop Designer Fabrics by the Yard | Curtains & Drapery
- Role of Window Treatments – Impact on Home Comfort – Shop Designer Fabrics by the Yard | Curtains & Drapery
- Fall Window Treatment Trends 2025: Warmth, Texture Tailored Elegance – Shop Designer Fabrics by the Yard | Curtains & Drapery