


Measure Drapery Hardware Width, Then Add One Inch
Measure First: Drapery Hardware Sizes Homeowners Need. 1For most home curtains, choose a 1-inch rod diameter; drop to 3/4 inch for sheers and go up to 1.25 to 1.5 inches for heavy blackout or velvet panels. Standard lengths run in bands from 28 to 170 inches, and the rod should extend 3 to 6 inches past each side of the frame for typical rooms. Measure the window width three times and use the widest number for any outside-mounted rod.
TL;DR:
- Rod diameter should match fabric weight, with 1 inch for medium-weight fabrics and 1.5 inches or more for heavy blackout or velvet panels to prevent sagging.
- Standard rod lengths are grouped into four ranges from 28 to 170 inches, with overhang of 3 to 12 inches depending on the curtain type, and custom rods are recommended for windows wider than 170 inches or with complex shapes.
- Accurate measurement involves checking window width three times and selecting the largest, mounting brackets 4 to 6 inches above the frame, and considering fabric fullness when determining panel quantity and hardware.
- Support brackets should be spaced at least every 6 feet for heavy fabric, and proper support, bracket projection, and rod diameter matching are critical to prevent bowing or wall pullout.
- Custom fabrication and professional installation are essential for oversized or uniquely shaped windows, ensuring hardware and fabric are precisely sized for optimal function and appearance.
Table of Contents
- What Rod Diameter Do You Actually Need?
- What Are the Standard Rod Lengths?
- How Do You Measure for Drapery Hardware?
- How Do You Choose the Right Bracket Projection and Spacing?
- Which Header Style Needs Which Hardware?
- What Accessory Sizes Do You Need to Match?
- When Should You Choose Custom Fabrication or a Professional Installer?
- How Does Curtain Fullness Change Your Hardware Math?
- How Much Stack-Back Space Do Layered Treatments Need?
- Does Fabric Type Change Hardware Beyond Just Weight?
- A Drapery Pro’s Take on What Usually Goes Wrong
- Ready to Order the Right Hardware the First Time?
- Sources
- FAQ
What Rod Diameter Do You Actually Need?
Diameter is not a style detail you pick last. It is the load-bearing decision that determines whether your curtains hang flat or slump in the middle within a month.
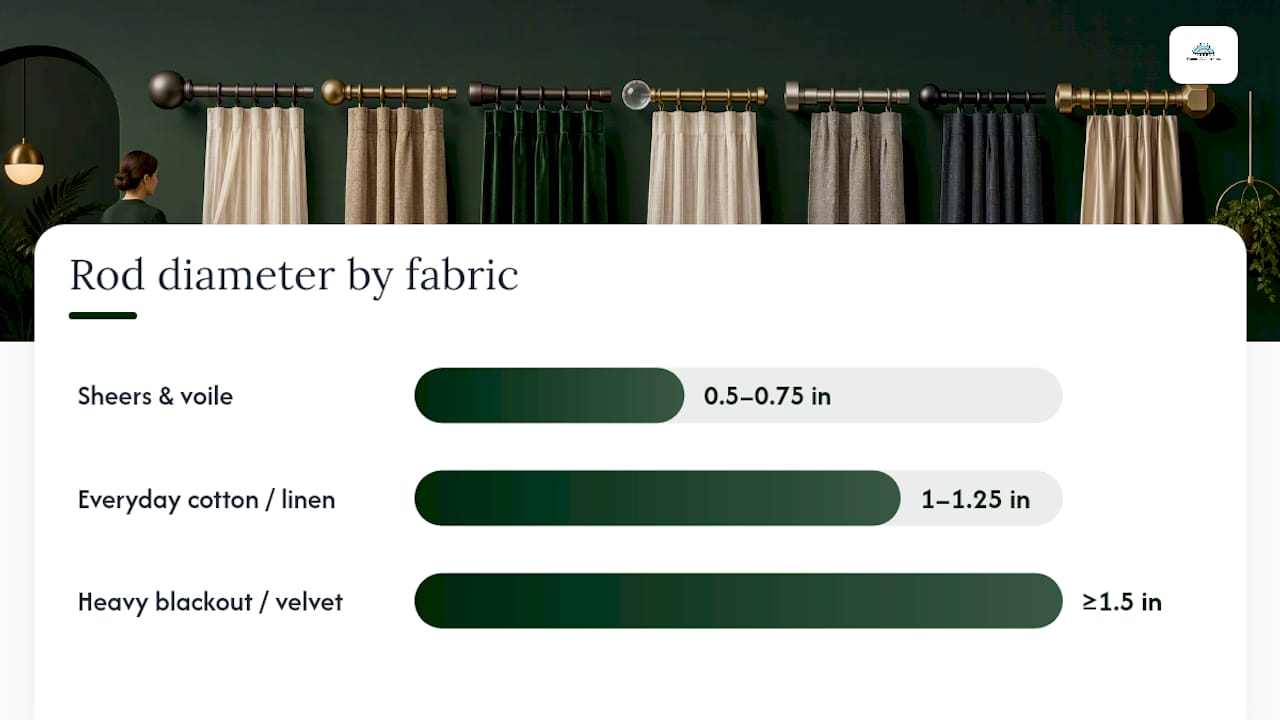
Standard curtain rod diameters typically range from 0.5 to 1.5 inches, with 1 inch acting as the everyday workhorse for medium-weight cotton, linen blends, and mid-weight drapery panels. Rods under 0.75 inches work fine for lightweight voile or sheer panels that carry almost no weight. Once you get into 1.5 inches and larger, you are in blackout, velvet, and heavy jacquard territory, where the fabric itself weighs several pounds per panel.
Fabric weight and rod diameter, side by side:
- Sheers and voile: 0.5 to 0.75 inch rod
- Everyday cotton, linen, and mid-weight drapery: 1 to 1.25 inch rod
- Heavy blackout, velvet, or multi-layer panels: 1.5 inch or larger rod, often with a center support
Diameter is an engineering choice, not just an aesthetic one. A rod that’s too thin for the fabric load leads to visible sag and, eventually, brackets pulling loose from the wall.
Structurally, any span wider than about 6 feet carrying medium or heavy fabric benefits from a center support bracket, regardless of diameter. Skipping that support is the single most common reason a rod that looked fine in the store starts bowing in the middle after a season of use.
There is also a proportion argument. A 1/2-inch rod on an 8-foot picture window looks flimsy even if it technically holds the fabric. Wide or tall windows generally read better with a rod one size up from the minimum the fabric requires, both because it holds weight with margin and because a slightly heavier profile balances a large expanse of glass. If you’re working with unusually heavy custom fabric, our guide to choosing the right fabric for drapery walks through how weight and drape interact with hardware choice before you order either one.
What Are the Standard Rod Lengths?
Retailers stock rods in a handful of predictable bands, and knowing them saves a return trip when your first pick comes up an inch short.
Standard curtain rod lengths commonly sold fall into four ranges:
- 28 to 48 inches — narrow windows, closets, and small bathroom or kitchen openings.
- 48 to 84 inches — the most common band, covering standard single and double windows.
- 66 to 120 inches — wide windows, sliding glass doors, and modest bay configurations.
- 120 to 170 inches — expansive walls of glass, wide patio openings, and multi-window runs.
Length alone doesn’t tell you where the rod ends up hanging, though. Standard overhang for everyday rooms is 3 to 6 inches per side beyond the window frame, which lets panels stack neatly off the glass without looking stretched. For blackout or thermal drapes, push that to 8 to 12 inches per side. The extra stack-back space lets thick panels pull fully clear of the window when open, so they actually block light when closed instead of leaking it around the edges. Wide patio doors and French doors often need even more overhang on the operating side to keep fabric from blocking the door swing.
Adjustable telescoping rods cover most standard windows and are the practical choice when your measurement lands cleanly inside one of the bands above. Once a window falls between bands, or exceeds 170 inches, custom fabrication becomes the more reliable route, since a stretched adjustable rod at its maximum extension tends to sag more than a rod cut to the correct length. Our breakdown of standard curtain width sizing is worth a look if you’re also deciding how many panels to order alongside the rod.
How Do You Measure for Drapery Hardware?
Get the measuring sequence right and every other decision, diameter, length, bracket spacing, falls into place. Get it wrong and you’re reordering hardware.
- Measure width three times. Check the window at the top, center, and bottom of the frame. Walls settle and frames are rarely perfectly square, so use the largest of the three measurements for an outside-mounted rod. For an inside-mount or tension rod, use the smallest reading instead, since that rod sits inside the frame opening.
- Set your rod height. Mount brackets 4 to 6 inches above the window frame for a taller, more formal look, or closer to the ceiling if you want maximum visual height in a room with low windows.
- Decide on panel length. Sill-length panels stop just below the window ledge, floor-length hovers half an inch above the floor, and puddle-length adds 2 to 3 inches of extra fabric that pools on the floor.
- Measure trim depth and obstacles. Note how far window trim, blinds, or a radiator projects from the wall. This number determines how far your brackets need to reach so the rod clears everything underneath.
Pro Tip: Measure your window at least twice on separate visits if you can, once in daylight and once with the room lit at night. Trim shadows and glare can make it surprisingly easy to misjudge frame width by half an inch, which is enough to throw off bracket placement.
Once you have all four numbers, width, height, panel length, and projection, you have everything a workroom or a hardware retailer needs to fill an order correctly the first time.
How Do You Choose the Right Bracket Projection and Spacing?
Brackets are where a lot of otherwise careful measuring falls apart, because projection and return get confused constantly, and they solve different problems.
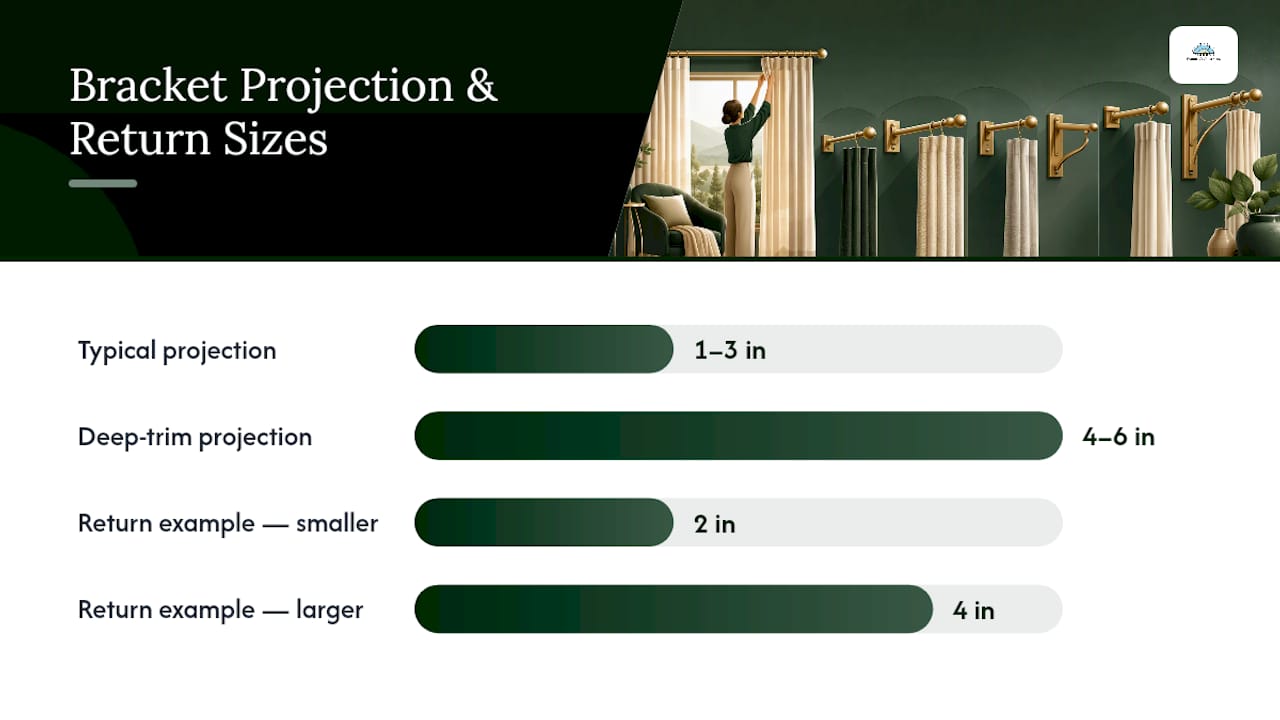
Projection is the distance the bracket holds the rod away from the wall, measured from wall to rod center. Return is the distance from the rod back to the wall along the bracket arm, which determines how close the fabric sits to the wall when the panel is fully closed.
- Typical projection for most rooms: 1 to 3 inches, enough to let a single panel swing freely.
- Deep trim, blinds, or stacked layered treatments: 4 to 6 inches, since fabric needs somewhere to gather without hitting the wall.
- Return dimensions directly affect fabric deductions in a custom order. A workroom cutting panels for a rod with a 4-inch return will subtract more width from the flat fabric than one with a 2-inch return, since that fabric wraps the bracket instead of hanging flat.
Support spacing follows the length of the rod, not just its diameter. As a general rule, add a center support for any span beyond 6 feet, and add an additional support roughly every 4 to 5 feet after that for heavy fabric. Anchor choice matters just as much as bracket count: drywall alone rarely holds a fully loaded heavy-drape bracket, and you generally want the screws driven into a stud or set with a proper wall anchor rated for the weight.
Before ordering, run through a quick compatibility check: rod diameter has to match the bracket’s socket size exactly, and both need enough clearance for whatever rings or finials you plan to slide on. A step-by-step installation guide is useful here if you want to confirm bracket spacing before you commit to hardware.
Which Header Style Needs Which Hardware?
The top of your curtain panel, the header, dictates rod compatibility more than almost any other factor, and mismatching the two is one of the most common ordering mistakes.
- Grommet panels need a rod diameter roughly 1/4 inch smaller than the grommet’s inner diameter, so the panel slides smoothly without binding. Most grommet panels are built for 1 to 1.5-inch rods.
- Rod-pocket panels slide directly onto the rod with no rings, which keeps the look clean but makes them harder to open and close smoothly on wide spans. They work best on shorter runs or stationary panels rather than daily-use windows.
- Pinch pleat and ring systems use separate rings or hooks, generally at a rate of one ring per 4 to 6 inches of fabric width, and they need a rod diameter that matches the ring’s inside clearance so the panel glides instead of catching.
- Traverse systems, which use a cord-drawn track rather than an exposed rod, are worth considering for daily-use panels on wide windows where pulling fabric by hand isn’t practical.
If you’re ordering pleated panels, check the pin length the workroom used, since a mismatched pin depth is a quiet but frequent cause of pleats that hang unevenly. Our panel sizing guide covers how fullness and header style interact with the width you should order.
What Accessory Sizes Do You Need to Match?
Small hardware pieces cause a surprising share of returns, mostly because they get bought without checking them against the rod size already chosen.
- Drapery pins typically run 2 to 3 inches long, with the shorter length suited to lightweight fabric and the longer to heavier drapery that needs more support at the pleat.
- Ring inside diameters should sit just slightly larger than the rod diameter, enough to slide freely without so much gap that the rings clatter or tilt.
- Plan for roughly one ring or hook per 4 to 6 inches of panel width, and always order a few extra of both rings and pins. They’re cheap, and running one short mid-installation is a frustrating way to lose an afternoon.
- Finials need enough clearance from the wall or bracket to sit flush; measure the finial’s base width against your projection before ordering, especially on decorative or oversized styles.
Quick shopping checklist: rod diameter confirmed, bracket projection measured, pleats or hooks counted, and two or three extra rings and pins added to the order.
When Should You Choose Custom Fabrication or a Professional Installer?
Some windows simply outgrow standard hardware. Arched and bay windows, spans wider than 170 inches, motorized traverse systems, and heavy multi-layer treatments all tend to need fabrication built to the exact opening rather than an off-the-shelf rod stretched to fit.
Custom drapery making services cover this gap by pairing fabric sales with design consultations, sample support, and installation guidance so the hardware and fabric are sized together instead of guessed at separately.
A short way to decide: if your window is a standard rectangle under 120 inches with medium-weight fabric, DIY hardware is usually straightforward. If you’re dealing with structural fixings, unusual shapes, or fabric heavy enough to need reinforced supports, professional measurement and fabrication remove most of the guesswork.
How Does Curtain Fullness Change Your Hardware Math?
Fullness, the ratio of flat fabric width to finished rod width, changes what “the right length rod” even means, and skipping this step is why some finished curtains look skimpy despite correct measurements everywhere else.
A pencil pleat or standard gathered header typically wants 2 to 2.5 times fullness, meaning a 60-inch rod needs 120 to 150 inches of flat fabric before pleating. Pinch pleats often run closer to 2 to 2.5 times as well, while grommet panels usually look best around 1.5 to 2 times fullness since the folds are more structured and less dense.
None of that changes the rod diameter or length band you choose. It changes how many panels you need and how many rings or hooks go on the rod. A common mistake is calculating fullness against the window width instead of the rod’s actual finished length, which includes the overhang on both sides. Always run the fullness math against the rod length you’ve settled on, not the raw window measurement, since that overhang adds several inches that need covering too.
If you’re ordering pleated panels through a workroom, tell them the finished rod length and the fullness ratio you want. That’s more useful information than the window size alone, and it’s what determines how much fabric actually gets cut.
How Much Stack-Back Space Do Layered Treatments Need?
Layering a sheer panel behind a blackout or drapery panel is one of the most requested looks, and it is also where stack-back allowances get underestimated most often.
Each layer needs its own clearance when the curtains are open. A single panel typically stacks back into roughly 6 to 8 inches per side of overhang space. Add a second layer, sheer behind blackout, for instance, and that number often needs to grow to 10 to 14 inches per side combined, since both fabrics need somewhere to gather without overlapping the glass.
The practical fix is a double rod system: an inner rod mounted closer to the window for the sheer layer, and an outer rod with more projection for the heavier layer. Give the inner rod slightly less overhang than the outer one, roughly 2 to 3 inches less per side, so the two layers stack cleanly without the sheer bunching awkwardly behind the heavier fabric. If your wall space is tight and full stack-back isn’t realistic, a traverse track for the heavier layer can reduce the physical bulk since the fabric compresses more evenly along a track than a plain rod.
Does Fabric Type Change Hardware Beyond Just Weight?
Weight gets most of the attention, but texture and drape behavior matter just as much once you’re choosing between a sheer, a mid-weight cotton, and a true blackout lining.
Sheers and voile are light, but they also tend to be slippery on a rod, which means smaller-diameter rods with a smooth rod-pocket or a lightweight ring system usually perform better than grommets, which can let the thin fabric bunch unevenly. Mid-weight cottons and linens are the most forgiving fabric type; they work across nearly every header style and rod diameter in the 1 to 1.25-inch range without much fuss. Blackout and thermal linings behave differently again. They’re stiffer than their weight alone suggests, which means they need not just a larger diameter rod but also wider ring or grommet clearance so the stiffer fold doesn’t bind while opening and closing.
Velvet sits in its own category. It’s heavy, but it also drapes densely, holding pleats with very little movement once hung. That density is exactly why velvet panels benefit from center-supported 1.5-inch or larger rods even on spans that a lighter fabric could handle with standard support spacing.
A Drapery Pro’s Take on What Usually Goes Wrong
The single most common mistake isn’t diameter or length. It’s rounding the wrong direction after hardware deductions. Always round the final drapery length down to the nearest quarter inch, never up, or panels end up dragging on the floor. Order one extra bracket and a handful of extra rings every time. And use a center support the moment a span crosses roughly 6 feet, no exceptions.
— Marrion
Ready to Order the Right Hardware the First Time?
This service offers an alternative to guessing your way through hardware aisles by providing fabric by the yard, custom drapery making, and installation guidance from one place that understands how the pieces fit together.

Getting started is simple. Take a few photos of your windows, measure width, height, and trim depth using the steps above, and reach out for fabric samples so you can see color and weight in your own light before committing. From there, Beautifulwindowselgin’s custom drapery and upholstery fabric by the yard collection gives you a starting point for browsing weights and patterns suited to the rod diameter you’ve already settled on. A design consultation can confirm hardware sizing and fabric fullness before anything gets cut, and installation guidance is available. Visit the Beautiful Windows Elgin landing page to request samples or book a consultation today.
Sources
- Choosing the right curtain pole diameter — Made by the Forge
- Standard Curtain Rod Sizes (with Drawings) | Upgraded Home
- How to measure for curtain rods — Wayfair
FAQ
What Are the Standard Sizes for Drapery Rods?
Standard drapery rods are sold in four length bands: 28 to 48 inches, 48 to 84 inches, 66 to 120 inches, and 120 to 170 inches. Diameter runs from 0.5 to 1.5 inches depending on fabric weight, with 1 inch as the most common everyday size.
What Is the Difference Between a 1-Inch and a 3/4-Inch Curtain Rod?
A 1-inch rod is the standard choice for medium-weight cotton, linen, and everyday drapery panels, while a 3/4-inch rod is built for lighter loads like sheers and voile. The thinner rod can sag or bow if you hang heavier fabric on it, especially across a wide span without a center support.
What Size Are Drapery Pins?
Drapery pins typically measure 2 to 3 inches long. Shorter pins suit lightweight panels, while the 3-inch length gives heavier drapery more support at the pleat so the fold holds its shape.
What Is the Best Drapery Hardware to Use?
The best hardware matches rod diameter to fabric weight, gives brackets enough projection to clear trim, and uses a center support on any span beyond roughly 6 feet. Custom drapery making services help pair fabric and hardware sizing together to avoid mismatches at checkout.
How Do I Know If I Need Custom Rod Length Instead of a Standard One?
If your window measurement falls between the standard bands, or exceeds 170 inches, a custom-cut rod holds weight more reliably than an adjustable rod stretched to its maximum extension. Arched, bay, or motorized installations also generally call for custom fabrication rather than off-the-shelf hardware.